Installing OpenText Portal 8.5 on Mac OS X
Posted November 7, 2013 by Gregory Guttmann
Pssst...here's a secret: you can install OpenText Portal (aka Vignette Portal) on Mac OS X. Although
I wouldn't advise it for production and good luck getting any support if anything goes wrong. That said, there is nothing
fundamentally stopping the Portal from running on OS X. It is a pretty standard Java web application: it needs a database
and an Application Server. I'll be using MySQL and Tomcat.
So let's assume that you've installed a Java JDK (version 1.7) for example and you've also installed MySQL. My
preference is to have MySQL, Tomcat, and Portal running in the /usr/local/ directory so the final
installation will look something like this:
/usr/local/
          /MySQL
          /portal85-dev
          /tomcat-portal85-dev
So now let's get started...
Get the Portal installation directory
Unfortunately there's not an easy way to do this. Your best bet
is to run the installer on Linux and then grab all of the files in the
portal directory and then put them into /usr/local/portal85-dev
Setting up the Database
Start MySQL
I'm going to assume that you've set up MySQL in /usr/local. The installer should create a
symbollic link so that /usr/local/mysql resolves to the install directory (ie: /usr/local/mysql-advanced-5.5.18-osx10.6-x86_64
. I didn't set up MySQL as a service so I manually start it up with these steps and then have it running in the background:
./usr/local/mysql/bin/mysqld_safe
[press Control-Z]
bg
Create a database schema for Portal
Now we're ready to create a database for the Portal's tables. We'll name the database p85dev and we'll create
a user called p85dev with a password called p85dev (feel free to use something a little secure).
cd /usr/local/msql/bin
./mysql -u root
mysql> create database p85dev;
mysql> create user 'p85dev'@'localhost' identified by 'p85dev';
mysql> grant all on p85dev.* to 'p85dev'@'localhost';
mysql> exit
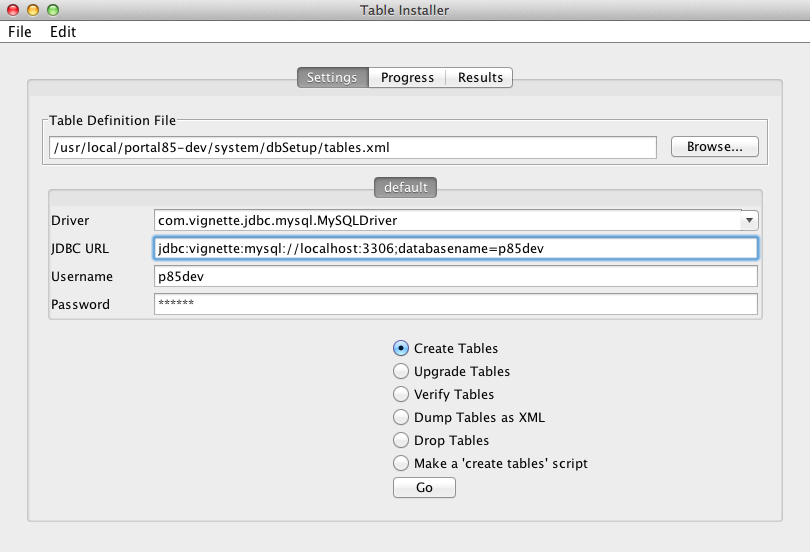
Run the table installer
The Portal comes with a very handy Java Swing Application that can be used to install tables for you.
Run it with the following:
cd /usr/local/portal85-dev/bin
./table_installer.sh
Fill the database account information in the table installer screen so it can install the tables:
Letting the Portal know where the database is
Modify the /usr/local/portal85-dev/config/properties.txt file to include the following information
default.db.user=p85dev
default.db.password=p85dev
default.db.driver=com.vignette.jdbc.mysql.MySQLDriver
default.db.url=jdbc:vignette:mysql://localhost:3306;databasename=p85dev
Configure the first admin user
Now that the properties.txt files has been modified with the database, you're ready to create the first admin user.
This tool will add a Server Admin account only if there are no Server Admins in the system.
cd /usr/local/portal85-dev/bin/

./create_first_admin_account.sh

Admin's login name: admin
Admin's password: admin
Wed Nov 06 12:17:05 PST 2013: Loading startup properties from: /usr/local/portal85-dev/config/properties.txt
Wed Nov 06 12:17:06 PST 2013: [RandomConfiguration] Creating random seed file: /usr/local/portal85-dev/system/random.dat
Wed Nov 06 12:17:06 PST 2013: [EncryptionConfiguration] Specified Cipher algorithm (Blowfish/ECB/PKCS5Padding) not supported by installed provider.  Will attempt to load a provider dynamically.
Wed Nov 06 12:17:06 PST 2013: [EncryptionBootstrap] Attempting to load JCE provider: com.sun.crypto.provider.SunJCE
Wed Nov 06 12:17:06 PST 2013: [EncryptionConfiguration] Provider SunJCE already loaded.
Wed Nov 06 12:17:06 PST 2013: [EncryptionConfiguration] Generating default master key...
Wed Nov 06 12:17:06 PST 2013: successfully read the configuration properties from database
Vignette Portal Installation directory is: /usr/local/portal85-dev
A new admin user named "admin" will be installed the next time you restart Vignette Portal.
Setting up the Application Server
Download Tomcat
Go to http://tomcat.apache.org/download-60.cgi and grab
the either the tar.gz or the zip version. Open up the archive and copy the files into
/usr/local/tomcat-portal85-dev/.
Configure Tomcat
First we're going to rename the server.xml to server.original.xml to keep in case you want to revert to the original.
cd /usr/local/tomcat-portal85-dev/conf/
mv server.xml server.original.xml
Now we're going to create a very minimalistic server.xml file where Tomcat will run on port 8085 and
port 8185 will be reserved for the shutdown port.
<?xml version='1.0' encoding='utf-8'?>
<Server port="8185" shutdown="SHUTDOWN">

  <Listener className="org.apache.catalina.core.AprLifecycleListener" SSLEngine="on" />
  <Listener className="org.apache.catalina.core.JasperListener" />
  <Listener className="org.apache.catalina.mbeans.ServerLifecycleListener" />
  <Listener className="org.apache.catalina.mbeans.GlobalResourcesLifecycleListener" />
  <GlobalNamingResources>
    <Resource name="UserDatabase" auth="Container"
              type="org.apache.catalina.UserDatabase"
              description="User database that can be updated and saved"
              factory="org.apache.catalina.users.MemoryUserDatabaseFactory"
              pathname="conf/tomcat-users.xml" />
  </GlobalNamingResources>

  <Service name="Catalina">

    <Connector port="8085" protocol="HTTP/1.1" connectionTimeout="20000" />

    <Engine name="Catalina" defaultHost="localhost">
      <Realm className="org.apache.catalina.realm.UserDatabaseRealm" resourceName="UserDatabase"/>
      <Host name="localhost"  appBase="webapps" unpackWARs="true" autoDeploy="true" xmlValidation="false" xmlNamespaceAware="false"></Host>
    </Engine>
  </Service>
</Server>
OK - time to test Tomcat
cd /usr/local/tomcat-portal85-dev/
./bin/startup.sh
If you can browse to http://localhost:8085 then we're
ready to continue.
Set the VAP_HOME variable
Because of the way that the portal operates, the web application that is deployed to Tomcat needs to
know where the portal home directory is located.
Create a new file called /usr/local/tomcat-portal85-dev/bin/setenv.sh with the following 2 lines:
VAP_HOME=/usr/local/portal85-dev
CATALINA_OPTS='-Xms256m -Xmx512m -Dcom.vignette.portal.installdir.path=$VAP_HOME'
Modify the shared.loader
Edit the Catalina.properties file and adjust the shared.loader line. If you don't do this modification,
you'l run into a java.lang.NoClassDefFoundError...com/vignette/portal/config/PortalSystem error.
shared.loader=/usr/local/portal85-dev/lib/shared/*.jar,/usr/local/portal85-dev/lib/shared/
Load the portal.war file into Tomcat
So now we're ready to copy the portal.war into Tomcat:
cp /usr/local/portal85-dev/portal.war /usr/local/tomcat-portal85-dev/webapps/
It will take a minute or two, but if you still have Tomcat running the war file should expand
itself into the /usr/local/tomcat-portal85-dev/webapps/ directory. Take a peek at
the directory and check to see if it has expanded. If not, you might want to try stopping and starting
Tomcat.
Once the war file has been deployed, wait for 5 minutes and then go to
http://localhost:8085/portal. If you see the
message that the portal is still starting, then wait some more. If the screen is blank, then you're ready
to restart Tomcat:
cd /usr/local/tomcat-portal85-dev
./bin/shutdown.sh
./bin/startup.sh
Getting Started
Now you're ready to go to http://localhost:8085/portal
and login to the portal. Of course if you want to get any real work done, be sure to
grab a copy of Siterise first.
If you run into any trouble, don't hesitate to reach out. Use my name below at sutrosoftware to send me an email.
-Greg
